

Google Image License promotes two Copyright metadata for images and will display them in search results. This will allow web users to easily identify and contact the image licensor. As photographers, how can we set these metadata in Photoshop CC : WebStatement and LicensorURL ?
Photoshop allows you already to set WebStatement (as “Copyright Info URL“) and LicensorURL in its interface. I will show you how to set these metadata step-by-step manually and in a batch.
How to Set Manually LicensorURL and WebStatement in Photoshop CC
How to Set LicensorURL and WebStatement in Photoshop CC with Metadata Templates
How to Set LicensorURL and WebStatement in Photoshop CC with a Java Script
Check metadata WebStatement and LicensorURL
Google Image License
Google has been providing Authoship and License information in searches for a long time :
- images declared with Creative Commons Licenses
- the Image Credits link.
I will not describe these Google features in this article. If you wish to know more, you may visit my The Photographer’s Metadata Survival Guide.
Now Google is implementing a new feature : Google Image License. Google search engine will be able to show the web user links to licensing pages on your website. As a photographer, you will be able to display your image copyrights and provide a way for anyone on the web to contact you and purchase your picture.
Here is the official documentation for Google Image License
Google Image License uses :
- either the Webstatement and LicensorURL metadata
- or structured data.

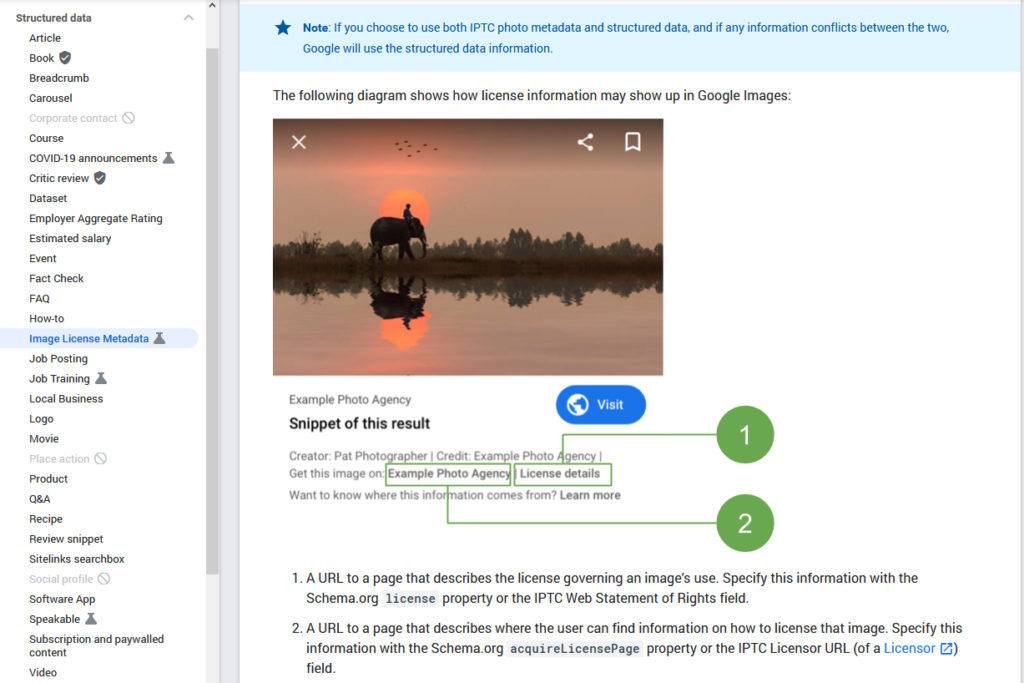
In case you opt for the metadata in the image file option, here are the metadata properties Google reads :
- WebStatement is a URL to a page that describes the license governing an image’s use.
- LicensorURL a URL to a page that describes where the web user can find information on how to license that image.
In this article, I will focus on Webstatement and LicensorURL, and the way to define these two metadata properties in the Photoshop environment.
How to Set Manually LicensorURL and WebStatement in Photoshop CC
WebStatement
Let’s start with WebStatement. This metadata is part of the xmpRights set of properties.
For the record, here are the metadata properties covered in xmpRights :
| xmpRights metadata domain name | Photoshop / Bridge name |
| Certificate | – |
| Marked | – |
| Owner | – |
| UsageTerms | [IPTC Status] Rights Usage Terms |
| WebStatement | [Basic] Copyright Info URL |
In Photoshop CC FileInfo, you will find WebStatement in the Basic section, renamed as “Copyright Info URL”.
The Photoshop name for WebStatement is “Copyright Info URL”.
![Photoshop Screenshot for metadata "[Basic] Copyright Info URL" alias "WebStatement"](https://blog.laurencebichon.com/wp-content/uploads/2020/05/webstatement-in-photoshop-by-laurence-bichon-photographer-1024x683.jpg)
Even if metadata UsageTerms is not concerned by Google Image License, I set it personally. Here is how. In Photoshop CC FileInfo, you will find it in the IPTC section, renamed as “Rights Usage Terms”.
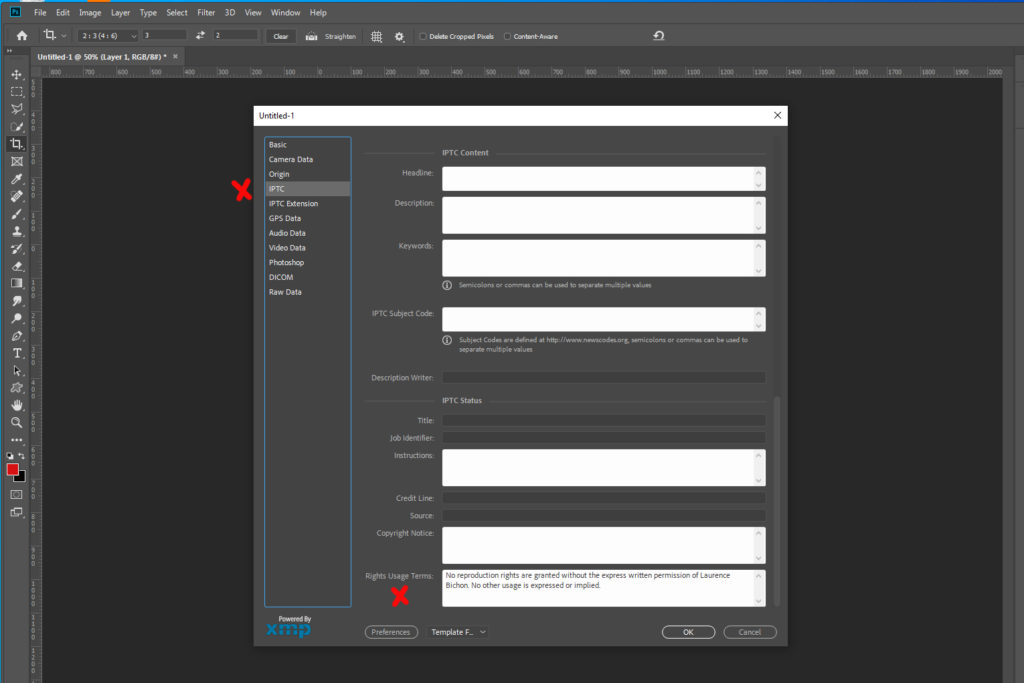
In this screen shot, you see that I set Rights Usage Terms to :
“No reproduction rights are granted without the express written permission of Laurence Bichon. No other usage is expressed or implied.”
Rights Usage Terms example
If you are interested in the list of copyright and authorship metadata I user in my process as a photographer, I wrote this article with the complete list of the metadata I set for copyright and their value.
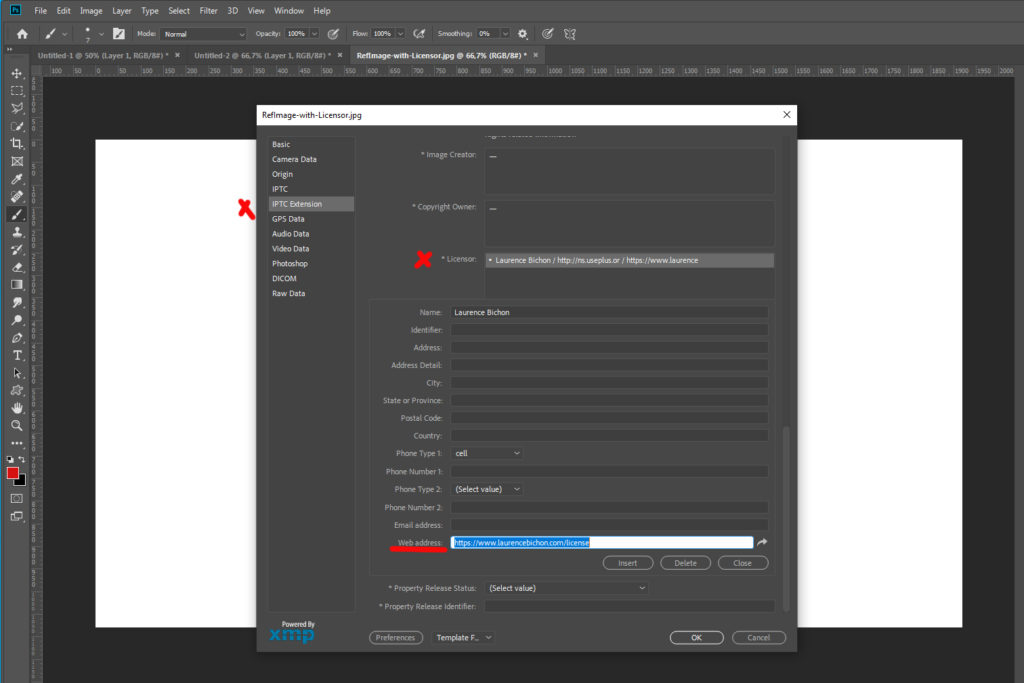
LicensorURL
LicensorURL is a string containing an URL where the webuser can find information in order to license the image.
LicensorURL if part of an xmp-plus structure array of Licensors :
- you can define several Licensors
- for each Licensor, you can define several properties. I will list them in a table below.
For the time being, I don’t know how Google will deal with several Licensors on an image.
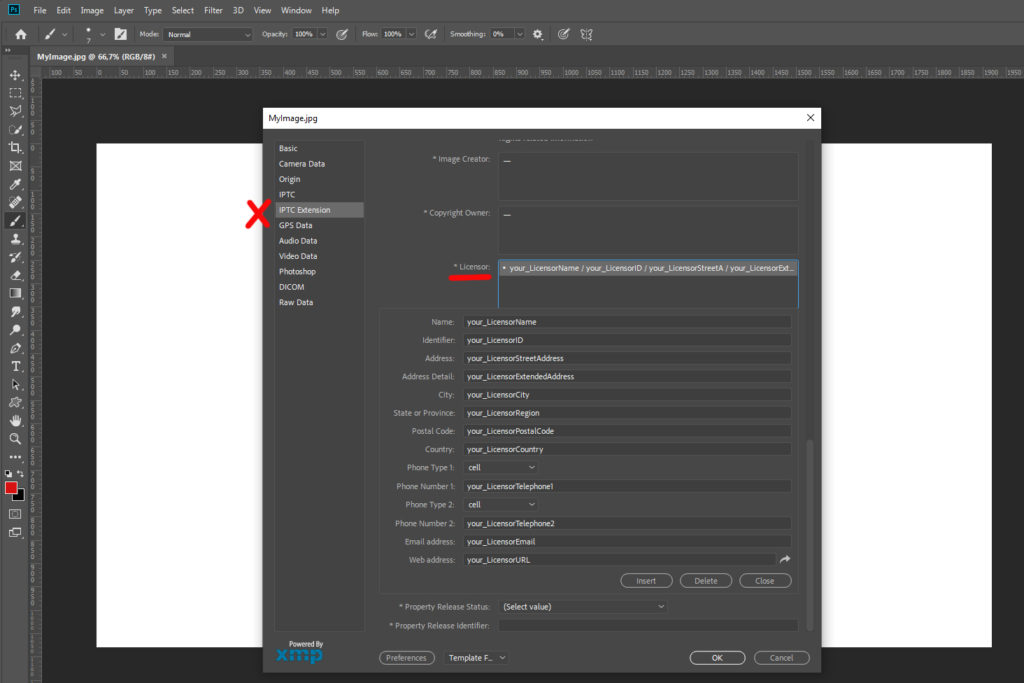
Here are the Licensor structure details :
| xmp-plus Licensor Detail (see the official Licensor detail documentation) | Photoshop / Bridge name IPTC Extension section |
| LicensorID | Identifier |
| LicensorName | Name |
| LicensorStreetAddress | Address |
| LicensorExtendedAddress | address Detail |
| LicensorCity | City |
| LicensorRegion | State or Province |
| LicensorPostalCode | Postal Code |
| LicensorCountry | Country |
| LicensorTelephoneType1 (choose in list) | Phone Type 1 |
| LicensorTelephone1 | Phone Number 1 |
| LicensorTelephoneType2 (choose in list) | Phone Type 2 |
| LicensorTelephone2 | Phone Number 2 |
| LicensorEmail | Email address |
| LicensorURL | Web address |
Here is a screenhot to illustrate how to create several Licensors with Photoshop :

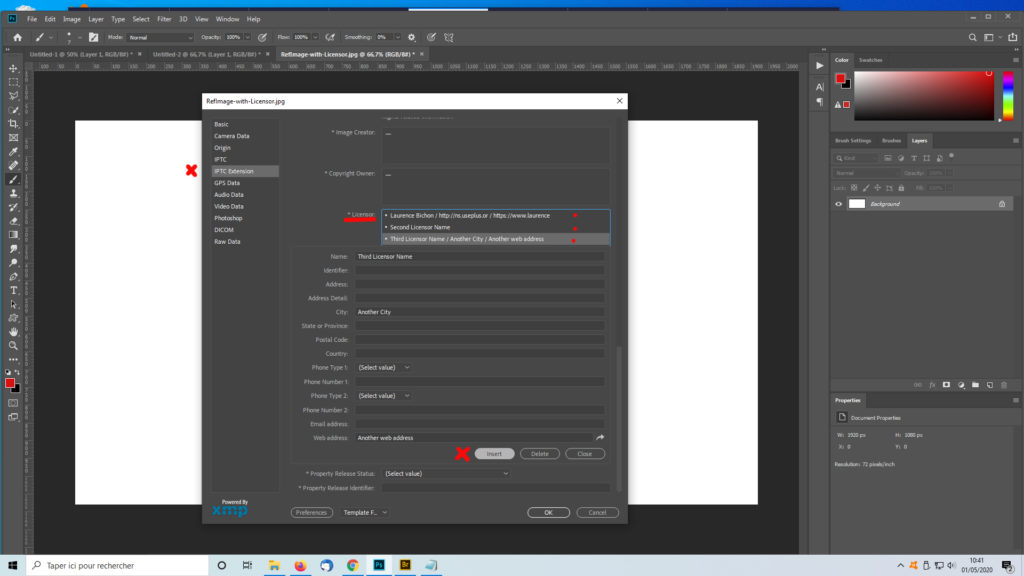
In this article, I will only consider the creation of one Licensor.
How to Set LicensorURL and WebStatement in Photoshop CC with Metadata Templates
Create / Apply / modify a Photoshop Metadata Template
You can save metadata templates in Photoshop CC and apply them to an image in FileInfo.
However, there is no metadata template tool.
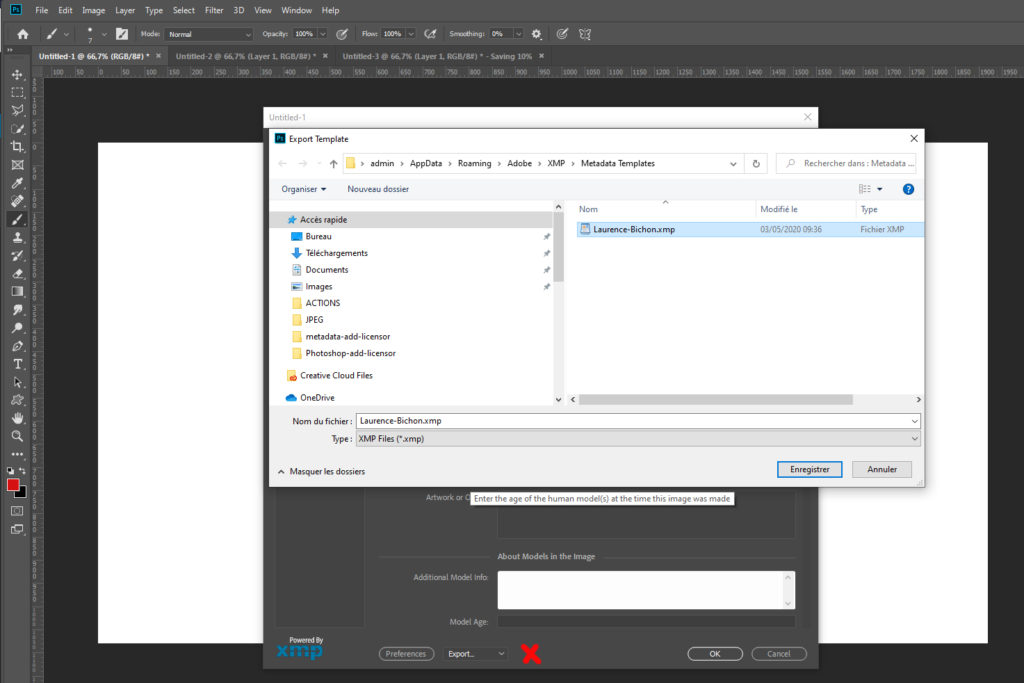
Here is how I do my templates : I create an empty file, then co go File > FileInfo.
I then enter only the metadata I want to save in the metadata preset.
Then I export the metadata set of this file as a preset.
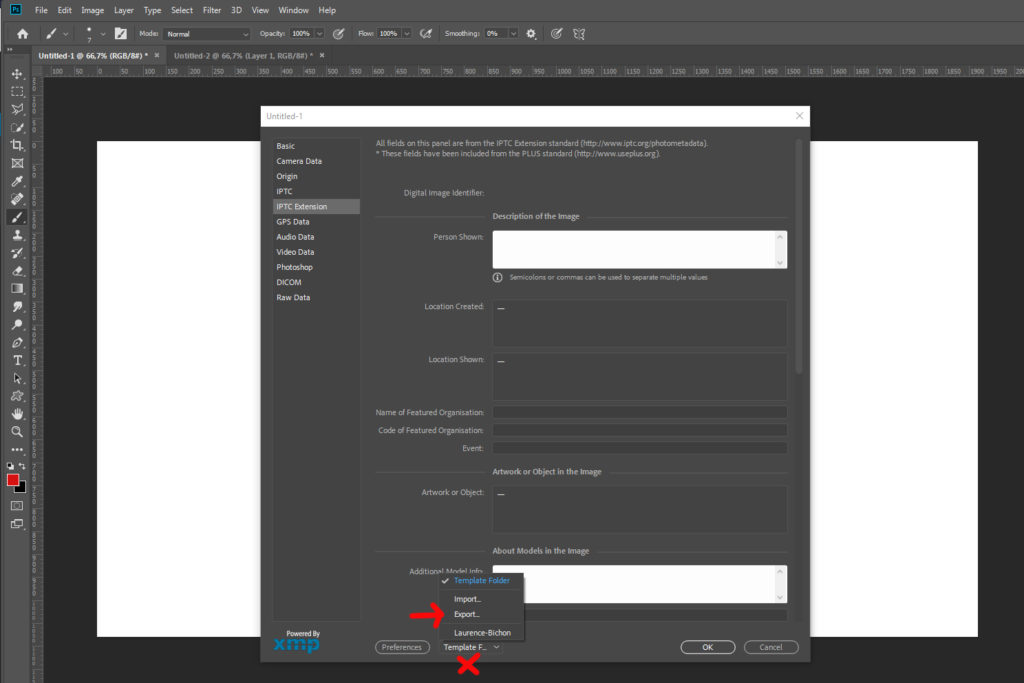
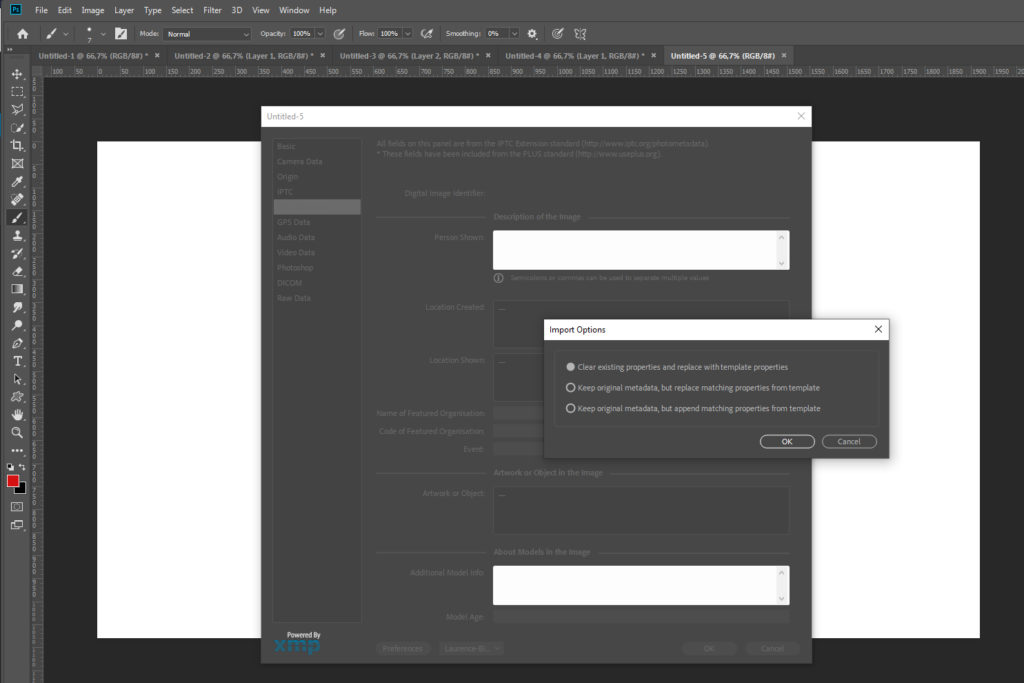
When importing a metadata template, you have 3 choices :
- Clear existing properties and replace with template properties
- Keep original metadata, but replace matching properties from template
- Keep original metadata, but append matching properties from template
If I want to modify a template, I create a new blank file, import the metadata template. Change or add metadata in it and export it again in with a new name or write over the old one.
As there is no metadata template tool, if you want to see the content of a metadata template, create a blank file and import the template you want info about.
Metadata template and Photoshop Actions
I had a problem when trying to set Webstatement and LicensorURL with a Photoshop Action.
- Webstatement can be updated, but the LicensorURL field remains empty (with all 3 Import options).
So it’s seems there is a Photoshop bug with importing the Licensor / LicensorURL metadata with a template via a Photoshop action in Photoshop CC 20.0.6 Release.
How to Set LicensorURL and WebStatement in Photoshop CC with a Java Script
I am going to show you how to set the WebStatement and Licensor metadata properties in Photoshop with java ExtendScript.
Create the adobe java script
I will work for this example in E:\SCRIPTS and name the java script with a example name. But you can of course use your own nomenclature.
Just the same, I’m a Windows user. But I just this tutorial will work on Apple just the same, providing you adapt the file handling parts of it.
Open a Windows file explorer, go to e:\SCRIPTS.
Create a text file AddMetaInPhotoshop.txt.
Rename it and change its extension to AddMetaInPhotoshop.jsx.
Open this file with Wordpad. If this is your first time with java ExtendScript .jsx file, maybe you will need to ask explicitely Windows to open this file with Wordpad. Just in case, you’ll find Wordpad in C:\ProgramData\Microsoft\Windows\Start Menu\Programs\Accessories.
Copy and customize the java script
The AddMetaInPhotoshop.jsx java script does the following :
- expects an active document (image) in input
- loads the AdobeXMPScript library.
- Opens the XMPFile structure of the active document.
- Inserts a WebStatement metadata with Adobe XMP-structured API.
- Inserts a Licensor metadata structure with a XMP-XML string.
- Updates and close the active document XMPFile structure.
- Closes the active document.
// java script Adobe Photoshop CC
//
//  Add Metadata WebStatement and Licensor
//
// This is a sample script.
//
// Adds WebStatement and one Licensor Structure
//
// HOW TO USE THIS SCRIPT ?
//
// USE ON A CLOSED FILE (ex: via Bridge > Tools > Photoshop > Image Processor
// Works on a SAVED document : use File > Save As before running this script.
//
// THIS SCRIPT UPDATES THE CURRENT FILE's METADATA. Does not work on a COPY.
//
//
//
// Does not cover metadata updates
// Multi licensors : not adressed
// No error handling
//
// Copyright 2020 Laurence Bichon photographe
// www.laurencebichon.com
//
//
//
function AddLicensor(LicensorCity,LicensorCountry,LicensorEmail,LicensorExtendedAddress,LicensorID,LicensorName,LicensorPostalCode,
LicensorRegion,LicensorStreetAddress,LicensorTelephone1,LicensorTelephone2,LicensorTelephoneType1,LicensorTelephoneType2,LicensorURL)
{

if(LicensorCity == undefined) LicensorCity = ''; if(LicensorCountry == undefined) LicensorCountry = '';

if(LicensorEmail == undefined) LicensorEmail = ''; if(LicensorExtendedAddress == undefined) LicensorExtendedAddress ='';

if(LicensorID == undefined) LicensorID = ''; if(LicensorName == undefined) LicensorName = '';

if(LicensorPostalCode == undefined) LicensorPostalCode = ''; if(LicensorRegion == undefined) LicensorRegion = '';

if(LicensorStreetAddress == undefined) LicensorStreetAddress = '';

if(LicensorTelephone1 == undefined) LicensorTelephone1 = ''; if(LicensorTelephone2 == undefined) LicensorTelephone2 = '';

if(LicensorTelephoneType1 == undefined) LicensorTelephoneType1 = 'cell'; if(LicensorTelephoneType2 == undefined) LicensorTelephoneType2 = 'cell';

if(LicensorURL== undefined) LicensorURL = '';

var s ="<x:xmpmeta xmlns:x=\"adobe:ns:meta/\" x:xmptk=\"Adobe XMP Core 5.3-c011 66.145661, 2012/02/06-14:56:27        \">";
s+="<rdf:RDF xmlns:rdf=\"http://www.w3.org/1999/02/22-rdf-syntax-ns#\">";
s+="<rdf:Description rdf:about=\"\" xmlns:plus=\"http://ns.useplus.org/ldf/xmp/1.0/\">";
s+="<plus:Licensor><rdf:Seq><rdf:li rdf:parseType=\"Resource\">";
s+="<plus:LicensorCity>"+LicensorCity+"</plus:LicensorCity>";
s+="<plus:LicensorCountry>"+LicensorCountry+"</plus:LicensorCountry>";
s+="<plus:LicensorEmail>"+LicensorEmail+"</plus:LicensorEmail>";
s+="<plus:LicensorExtendedAddress>"+LicensorExtendedAddress+"</plus:LicensorExtendedAddress>";
s+="<plus:LicensorID>"+LicensorID+"</plus:LicensorID>";
s+="<plus:LicensorName>"+LicensorName+"</plus:LicensorName>";
s+="<plus:LicensorPostalCode>"+LicensorPostalCode+"</plus:LicensorPostalCode>";
s+="<plus:LicensorRegion>"+LicensorRegion+"</plus:LicensorRegion>";
s+="<plus:LicensorStreetAddress>"+LicensorStreetAddress+"</plus:LicensorStreetAddress>";
s+="<plus:LicensorTelephone1>"+LicensorTelephone1+"</plus:LicensorTelephone1>";
s+="<plus:LicensorTelephoneType1>"+LicensorTelephoneType1+"</plus:LicensorTelephoneType1>";
s+="<plus:LicensorTelephone2>"+LicensorTelephone2+"</plus:LicensorTelephone2>";
s+="<plus:LicensorTelephoneType2>"+LicensorTelephoneType2+"</plus:LicensorTelephoneType2>";
s+="<plus:LicensorURL >"+LicensorURL +"</plus:LicensorURL>";
s+="</rdf:li></rdf:Seq></plus:Licensor>";
s+="</rdf:Description></rdf:RDF></rdf:RDF></x:xmpmeta>";

return s;

};

//######## STARTCUSTOMIZING WITH YOUR METADATA
WebStatement="your_WebStatement",

LicensorCity="your_LicensorCity";
LicensorCountry="your_LicensorCountry";
LicensorEmail="your_LicensorEmail";
LicensorExtendedAddress="your_LicensorExtendedAddress";
LicensorID="your_LicensorID";
LicensorName="your_LicensorName";
LicensorPostalCode="your_LicensorPostalCode";
LicensorRegion="your_LicensorRegion";
LicensorStreetAddress="your_LicensorStreetAddress";
LicensorTelephone1="your_LicensorTelephone1";
LicensorTelephone2="your_LicensorTelephone2";
LicensorTelephoneType1="http://ns.useplus.org/ldf/vocab/cell";
LicensorTelephoneType2="http://ns.useplus.org/ldf/vocab/cell";
LicensorURL="your_LicensorURL";

//######## END OF CUSTOMIZING SECTION

// load the library
if( ExternalObject.AdobeXMPScript ==undefined)
   {
   ExternalObject.AdobeXMPScript =new ExternalObject( "lib:AdobeXMPScript");
   }

var MyDoc = app.activeDocument.fullName;

MyXmpFile = new XMPFile(MyDoc.fsName, XMPConst.FILE_PHOTOSHOP, XMPConst.OPEN_FOR_UPDATE);

var MyXmp = MyXmpFile.getXMP();


xmp1 = new XMPMeta( );
xmp1.setProperty(XMPConst.NS_XMP_RIGHTS, "WebStatement", WebStatement);

XMPUtils.appendProperties(xmp1, MyXmp, XMPConst.APPEND_REPLACE_OLD_VALUES);

xmp2 = new XMPMeta( AddLicensor(LicensorCity,LicensorCountry,LicensorEmail,LicensorExtendedAddress,LicensorID,LicensorName,LicensorPostalCode,
LicensorRegion,LicensorStreetAddress,LicensorTelephone1,LicensorTelephone2,LicensorTelephoneType1,LicensorTelephoneType2,LicensorURL) );

XMPUtils.appendProperties(xmp2, MyXmp, XMPConst.APPEND_REPLACE_OLD_VALUES);

if  (MyXmpFile.canPutXMP( MyXmp ) )
    {
    MyXmpFile.putXMP( MyXmp );
    MyXmpFile.closeFile(XMPConst.CLOSE_UPDATE_SAFELY);
    }
else
   {
    alert("putXMP", "Problem occured");
    }

//UNCOMMENT THE NEXT LINE AFTER THE ACTION CREATION (REMOVE //)
//app.activeDocument.close();
You can download the script below here if you prefer. This is a .txt file. Rename it to .jsx.
Copy the script code in AddMetaInPhotoshop.jsx.
Before using it, customize the your_WebStatement strings as well as all your_Licensorxxx strings.
Create a Photoshop Action
We will now create a Photoshop action that will run the java script.
Open Photoshop and create a new empty image.
Save it in E:\SCRIPTS\myTmpImage.jpg.
This is important, otherwise the script will send an error.
Open the Photoshop Actions window and select an action set. hen Create a new action : ActionAddMetaInPhotoshop.
It starts recording.
Select File > Scripts > Browse
Navigate to E:\SCRIPTS and select the java script AddMetaInPhotoshop.jsx.
End the recording.
Then Remove myTmpImage.jpg.
Do not check the metadata in this myTmpImage.jpg image. It will not have been chenged, as there was a conflict between this Photoshop that opened the XMPfile of this image and the script that opened another time the XMPfile of this image. This image helps only for the action creation process.
Edit AddMetaInPhotoshop.jsx with Wordpad again and remove the comments on the last line :
//app.activeDocument.close();
becomes
app.activeDocument.close();
Save AddMetaInPhotoshop.jsx.
Note : I comment the document close instruction in the first place in order to be able to record the action and stay in Photoshop to stop the recording. Otherwise, the image closes, but we still record.
Run the Photoshop Action
This script opens the XMPFile structure of the active document (image). As a consequence, it can not be used when the image is opened in Photoshop.
I run this script from Bridge. Select on or several files, then Bridge > Tools > Photoshop > Batch.
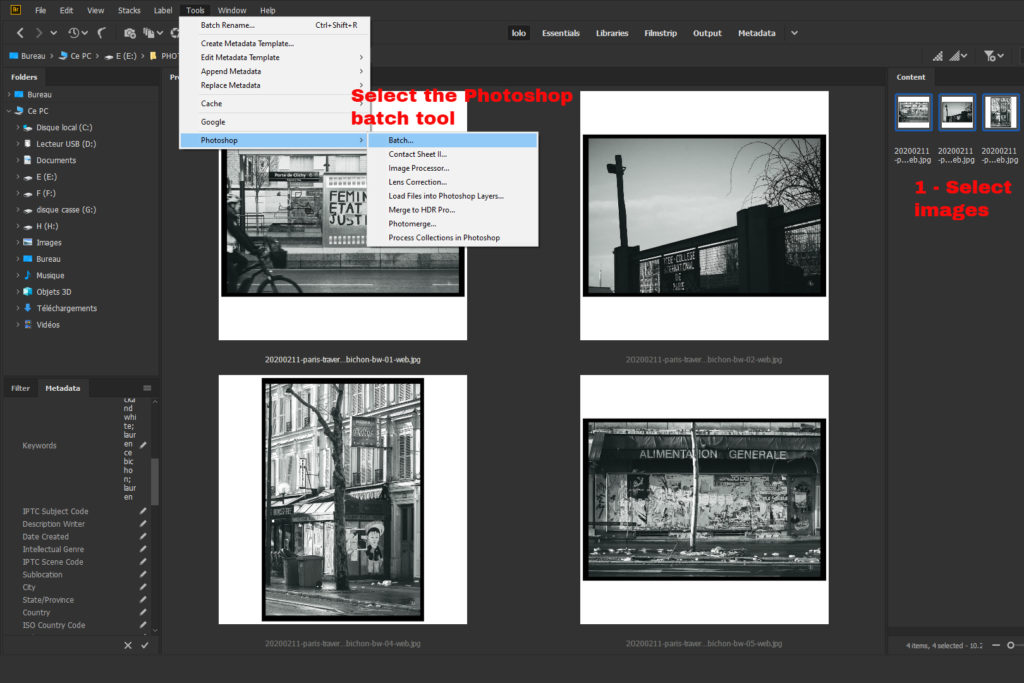
Then select the Photoshop ActionAddMetaInPhotoshop in the batch panel.

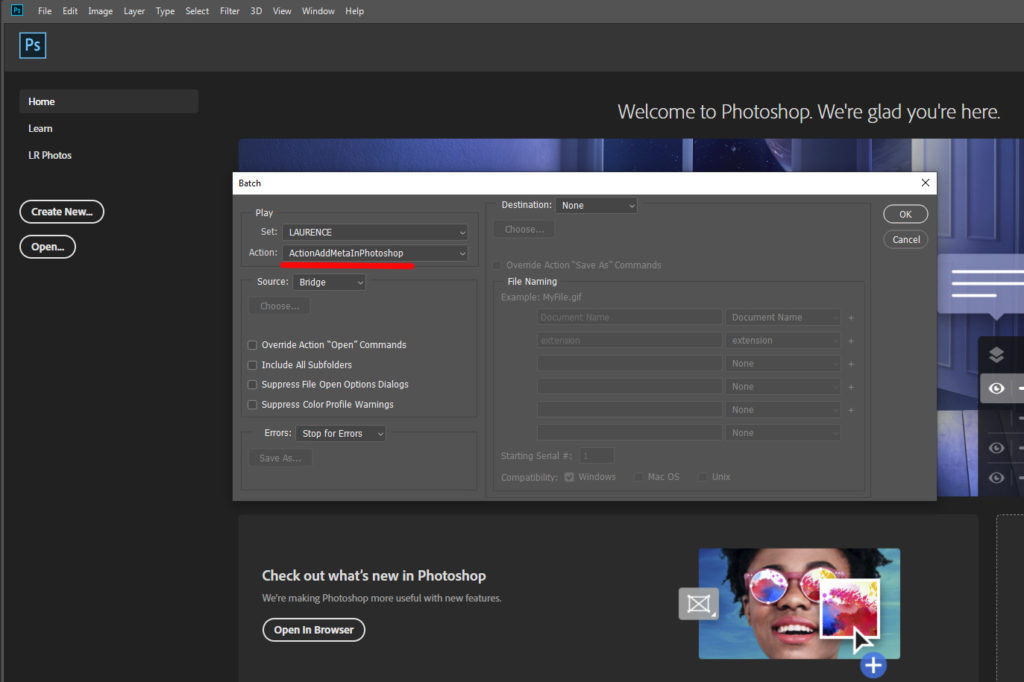
The batch tool will run the Photoshop CC action ActionAddMetaInPhotoshop on all selected images and will update their metadata in-place.
More About Adobe java ExtendScript and AdobeXMPScript.
You can find find more about Adobe java ExtendScript in the Adobe scripting developer center. In particular, there is the Photoshop CC JavaScript Reference.
When you program with Adobe APIs specifically on XMP metadata. You need to use another library :
- this library used to be documented in the jstools documentation. However, Adobe does not publish it online anymore. You can still find copies of the jstools documentation, as for instance here. This javascript lib:AdobeXMPScript library is obsolete. It still works with simple XMP structures. But arrays of structures as xmp-plus Licensor are not supported. That is why I constructed an XML string for the Licensor structure and passed it directly to the XMP file structure.
- the current XMP library and SDK is documented in Adobe XMP Developer Center. The XMP Toolkit SDK contains two libraries, XMPCore and XMPFiles which are provided as C++ implementations. As I wanted to stay with java script whenever possible, this C++ implementation is the reason why I sticked to the old Adobe XMP tools.
Check metadata WebStatement and LicensorURL
Check in Photoshop
You can open the image in Photoshop. It’s nice to see if Photoshop still reads the metadata structure correctly. You should have no warning or error message. Then Go to File > FileInfo.
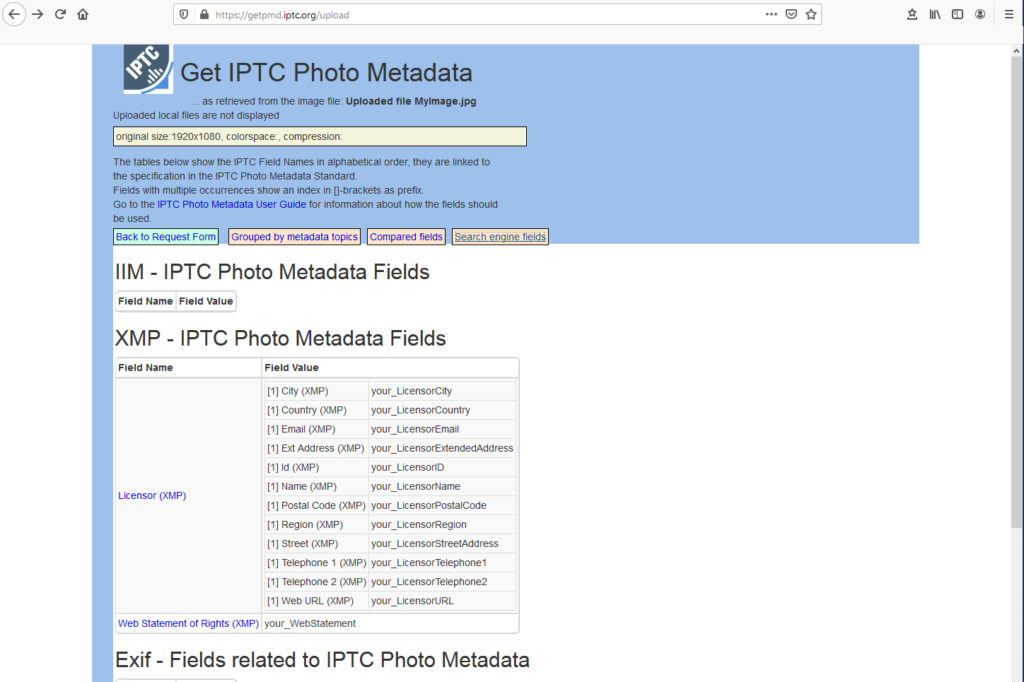
Check on the web
You can read an online metadata tool at getpmd.iptc.org.
With this tool, you can read metadata for image files on your computer or for images on the web.
Check with exiftool
Phil Harvey’s Exiftool is a command line tool that enables you lots of actions regaring image metadata.
I will not get into details, but just display an excerpt on an exiftool result below. I will also put a link to the whole exiftool result of the image we added metadata on.
---- XMP-xmpRights ----
Web Statement                   : your_WebStatement
---- XMP-plus ----
Licensor City                   : your_LicensorCity
Licensor Country                : your_LicensorCountry
Licensor Email                  : your_LicensorEmail
Licensor Extended Address       : your_LicensorExtendedAddress
Licensor ID                     : your_LicensorID
Licensor Name                   : your_LicensorName
Licensor Postal Code            : your_LicensorPostalCode
Licensor Region                 : your_LicensorRegion
Licensor Street Address         : your_LicensorStreetAddress
Licensor Telephone 1            : your_LicensorTelephone1
Licensor Telephone Type 1       : Cell
Licensor Telephone 2            : your_LicensorTelephone2
Licensor Telephone Type 2       : Cell
Licensor URL : your_LicensorURLConclusion
We’ve reached end of this article.
I hope these information will help you implement this new SEO copyright feature.
Thank you for your visit, and see you next time !